The Content JS SDK is the official JavaScript SDK from Optimizely for building headless applications with Optimizely CMS. In this blog, we’ll look at setting up the SDK and creating a component from scratch in Optimizely SaaS. The SDK is built and maintained by the Optimizely CMS team.
There are two official packages:
@optimizely/cms-sdk— the SDK itself, for fetching, typing, and rendering content@optimizely/cms-cli— the CLI, for pushing and pulling your content type definitions up to and down from the CMS
To get started, install both in your head application. The SDK is a runtime dependency, while the CLI is only needed during development, so it goes in as a dev dependency:
- npm install @optimizely/cms-sdk
- npm install -D @optimizely/cms-cli
Create an API client in the CMS by navigating to Settings → API Keys → Create API key. Give it a name, and the CMS will generate a Client ID and Client Secret. Add these to your environment variables (.env) file as shown below:
OPTIMIZELY_CMS_CLIENT_ID=<the client id>
OPTIMIZELY_CMS_CLIENT_SECRET=<the client secret>
Verify the connection by running:
npx @optimizely/cms-cli@latest login
If the credentials are valid, you’ll see a confirmation message: “Your credentials are correct.”
Serializing the Content Types
To pull the content-type definitions modeled in the SaaS UI, run the command below:
npx @optimizely/cms-cli config pull --output ./src/content-types --group
This fetches the content types from the CMS and generates TypeScript files in the src/content-types folder of your head app. The --output flag sets the target directory, and --group organizes the files by content-type base type.
Creating a component inside Head app
Once the content types modeled in the Optimizely SaaS UI are pulled into the file system, we can start creating the components inside the head application
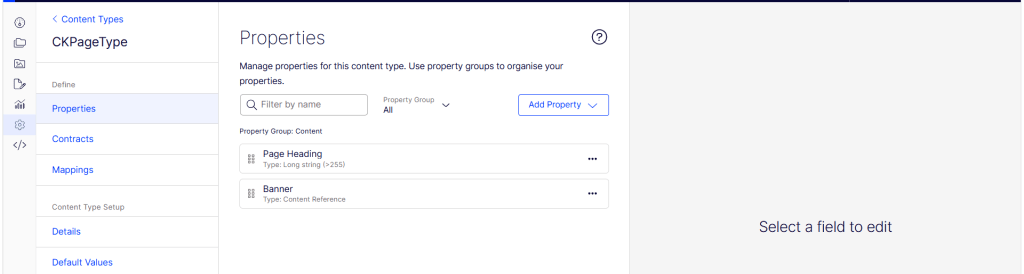
In the example below, I’ve added a page type that contains a Heading field and a reference to the Banner Block type.
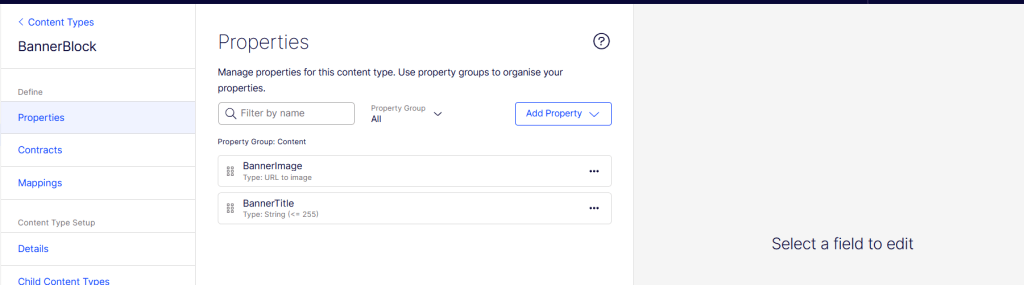
The Banner Block contains two fields, BannerImage and BannerTitle, as shown below:
Let’s get started creating the component above inside the head app using the Content JS SDK.
- Create BannerBlock component inside ‘src/components/component/BannerBlock.tsx’ file as below.
import type { ContentProps } from '@optimizely/cms-sdk';
import { getPreviewUtils } from '@optimizely/cms-sdk/react/server';

import type { BannerBlockCT } from '@/src/content-types/component/BannerBlock';

type BannerBlockContent = ContentProps<typeof BannerBlockCT>;

type Props = {
  content: BannerBlockContent;
  displaySettings?: Record<string, string | boolean>;
};

export default function BannerBlock({ content }: Props) {
  const { pa } = getPreviewUtils(content);
  const imageUrl = content.BannerImage?.default ?? content.BannerImage?.hierarchical;

  return (
    <section className="relative w-full overflow-hidden rounded-lg bg-zinc-100 dark:bg-zinc-800">
      {imageUrl && (
        <div {...pa('BannerImage')} className="relative aspect-[3/1] w-full">
          <img
            src={imageUrl}
            alt={content.BannerTitle ?? ''}
            className="h-full w-full object-cover"
          />
        </div>
      )}
      {content.BannerTitle && (
        <div className="px-6 py-4">
          <h2 {...pa('BannerTitle')} className="text-2xl font-bold text-zinc-900 dark:text-zinc-50">
            {content.BannerTitle}
          </h2>
        </div>
      )}
    </section>
  );
}
It maps the BannerImage and BannerTitle fields pulled from the Optimizely CMS onto the markup, deriving the image URL from either the default or hierarchical source. The key piece for the visual editor is getPreviewUtils, which provides the pa() helper—spreading {...pa('BannerImage')} and {...pa('BannerTitle')} onto an element tags it as editable, so Optimizely knows which DOM node maps to which field and can wire up inline editing and preview.
2. Add the PageType component inside ‘src/components/page/{{PageType}}.ts’ file.
import type { ContentProps } from '@optimizely/cms-sdk';
import { GraphClient } from '@optimizely/cms-sdk';
import { getPreviewUtils, OptimizelyComponent } from '@optimizely/cms-sdk/react/server';
import type { CKPageTypeCT } from '@/src/content-types/page/CKPageType';
type CKPageTypeContent = ContentProps<typeof CKPageTypeCT>;

type Props = {
  content: CKPageTypeContent;
  displaySettings?: Record<string, string | boolean>;
};

const client = new GraphClient(process.env.OPTIMIZELY_GRAPH_SINGLE_KEY!, {
  graphUrl: process.env.OPTIMIZELY_GRAPH_URL,
});

export default async function CKPageType({ content }: Props) {
  const { pa } = getPreviewUtils(content);

  let bannerContent = null;
  if (content.Banner?.url?.graph) {
    bannerContent = await client.getContent(content.Banner.url.graph);
  }

  return (
    <article className="mx-auto w-full max-w-4xl px-6 py-12">
      {content.PageHeading && (
        <h1
          {...pa('PageHeading')}
          className="mb-8 text-4xl font-bold tracking-tight text-zinc-900 dark:text-zinc-50"
        >
          {content.PageHeading}
        </h1>
      )}

      {bannerContent && (
        <div {...pa('Banner')}>
          <OptimizelyComponent content={bannerContent} />
        </div>
      )}
    </article>
  );
}
The page-type component renders PageHeading inline and resolves the Banner reference by fetching its full content from Optimizely Graph with GraphClient. That content is passed to <OptimizelyComponent>, which picks the right component to render it—here, the Banner Block—while pa() keeps both fields editable in the visual editor. Because Banner is a reference type, the page props don’t include the block’s data directly; instead they carry a reference to the Banner Block content, as shown below:
{
    "key": "2f98b7a09be346eb9d9637d155d12af0",
    "url": {
        "type": "INTERNAL",
        "default": null,
        "hierarchical": null,
        "internal": "cms://content/2f98b7a09be346eb9d9637d155d12af0?loc=en",
        "graph": "graph://cms/BannerBlock/2f98b7a09be346eb9d9637d155d12af0",
        "base": null
    },
    "item": {
        "__typename": "Data"
    }
}
Initializing the GraphClient requires the following environment variables:
OPTIMIZELY_GRAPH_SINGLE_KEY=<the optimizely graph single key>
OPTIMIZELY_GRAPH_URL=https://cg.optimizely.com/content/v2
You can obtain the Optimizely Graph Single Key by navigating to Settings → API Keys → Delivery Keys.
Note: <OptimizelyComponent> acts as a dynamic dispatcher — you hand it any resolved content item and it automatically looks up the matching React component registered for that content type and renders it, so you don’t have to write conditional logic to map content types to components yourself.
3. Then register the content type and react component as below.
import { initContentTypeRegistry } from '@optimizely/cms-sdk';
import { initReactComponentRegistry } from '@optimizely/cms-sdk/react/server';
import { CKPageTypeCT } from '@/src/content-types/page/CKPageType';
import { BannerBlockCT } from '@/src/content-types/component/BannerBlock';
import CKPageType from './page/CKPageType';
import BannerBlock from './component/BannerBlock';

initContentTypeRegistry([CKPageTypeCT, BannerBlockCT]);

initReactComponentRegistry({
  resolver: {
    CKPageType: CKPageType,
    BannerBlock: BannerBlock,
  },
});
This is the registration step that ties everything together. initContentTypeRegistry registers the content-type definitions (CKPageTypeCT, BannerBlockCT) that were pulled from the CMS, while initReactComponentRegistry maps each content type to its React component via the resolver. This mapping is exactly what <OptimizelyComponent> relies on at render time—it looks up a content type’s key in this resolver to find the right component to render, which is what makes the automatic, reference-based rendering shown earlier work.
Final Thoughts
That’s the full loop—from modeling content types in the Optimizely SaaS UI, pulling those definitions into the head app with the CLI, building React server components for each type, and finally registering everything so the SDK can resolve and render content automatically. <OptimizelyComponent> handles the heavy lifting of matching CMS content to the right component, including references like the Banner Block nested inside the page.v
What stands out working through the Content JS SDK is how little glue code you end up writing. The mental model is clean: model it, pull it, build it, register it. Adding a new block follows the same four steps every time, with no growing pile of conditional rendering to maintain.
