It started with a simple question from an editor:
“I’ve updated all twenty articles under News. Do I really have to publish them one by one?”
It’s a small request, and a perfect fit for something you can build yourself.
Optimizely SaaS CMS can be extended with apps built on Optimizely Connect Platform (OCP). You write a small TypeScript app, Optimizely hosts it, and it appears inside the CMS editor as if it had always been there. No servers to run, no separate admin site: just your feature, where editors already work.
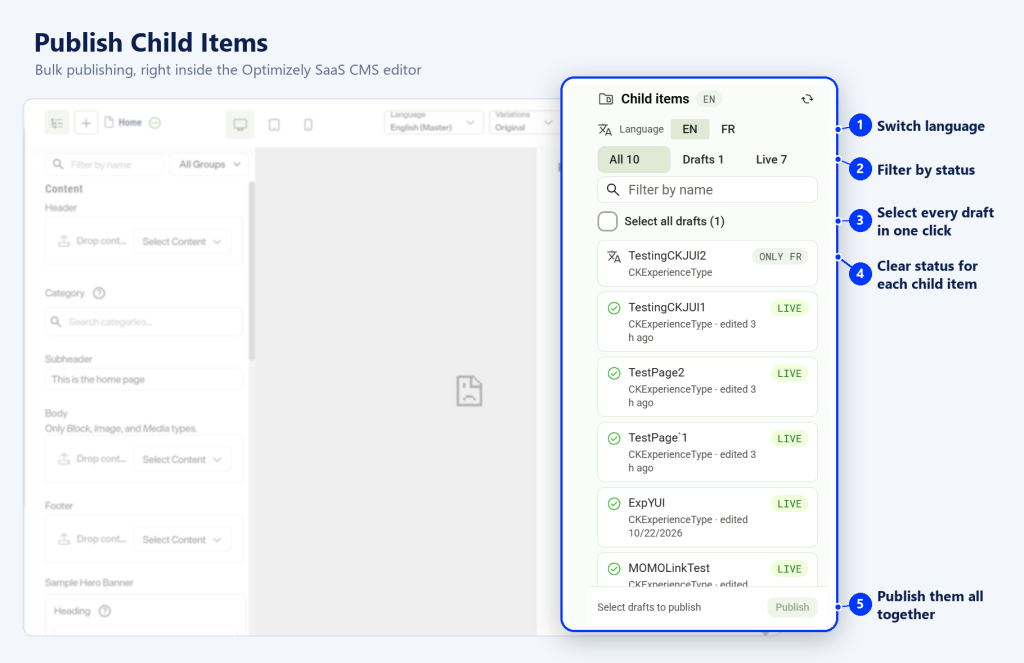
So we built Publish Child Items. You open a page, open the panel, tick the drafts, and click Publish. Twenty clicks become one.
Publish Child Items in the CMS sidebar: child pages with Draft and Live badges, ready to publish together.
This post follows that app from an empty folder to the App Directory. It’s the path we took, what we learned along the way, and what we’d tell anyone building their first SaaS CMS app.
Planning Your App
Before writing code, answer two simple questions.
Where should it appear in the CMS?
A CMS UI extension (beta) can show up in three places:
- Sidebar: a panel next to the page being edited
- View: a full page of its own
- Property editor: a custom input for one field
Our app works on the page you’re looking at, so we chose the sidebar.
What runs in the browser, and what runs on the server?
Your app has two halves:
- The UI runs in the editor’s browser. It shows things and handles clicks.
- A backend function runs on OCP. It does the real work, like calling the CMS API, and keeps secrets such as API keys safe.
Here’s how that split works in Publish Child Items:
- In the browser (UI): when an editor opens a page, the sidebar asks the backend for that page’s child items and shows them with their status, Draft or Live. The editor ticks the drafts and clicks Publish.
- On OCP (backend): the backend receives the request, uses the app’s CMS API key to fetch the children or publish the selected drafts through the CMS REST API, and sends the result back to the sidebar.
The editor only sees a simple panel. The API key and the CMS calls stay safely on the server.
💡 Tip: if a step needs a password or an API key, it belongs in the backend.
Setting Up Your Environment
A one-time setup, and then you’re ready to build.
What you need
- OCP developer access: ask your organisation admin for the Developer role. If OCP developer features aren’t enabled yet, Optimizely Support can switch them on.
- A SaaS CMS instance with UI extensions enabled: the feature is in beta, so ask Optimizely Support to enable it for your instance.
- Node.js 22 or later and Git on your machine.
Step 1: Create your developer API key
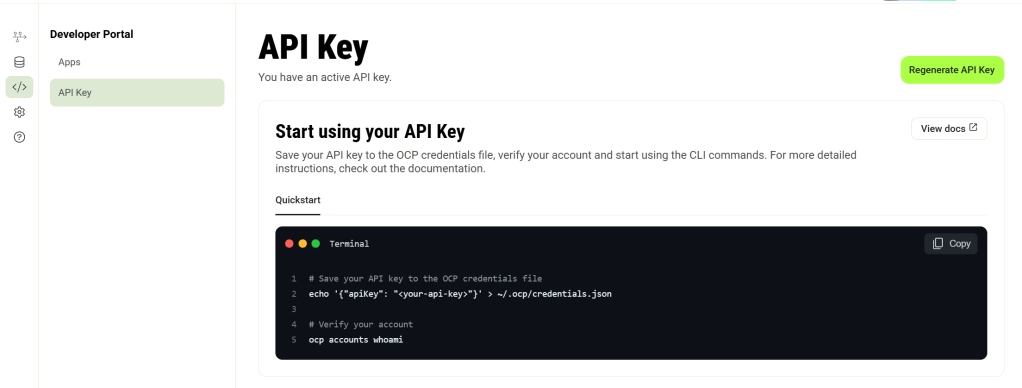
In the OCP Developer Portal, generate an API key. The CLI uses it to act on your behalf.
Don’t see an API Keys section in the portal? It isn’t enabled by default. Raise a request with the Optimizely Support team to enable it for your account, and once it appears, you can create your key.
Step 2: Install the OCP CLI
On Windows, in PowerShell:
iwr -useb https://cli.ocp.optimizely.com/install.ps1 | iex
On macOS or Linux:
curl -fsSL https://cli.ocp.optimizely.com/install.sh | bash
Open a new terminal and check it: ocp --version should show 2.x.
Step 3: Save your API key
The CLI reads the key from ~/.ocp/credentials.json (on Windows, %USERPROFILE%\.ocp\credentials.json):
{ "apiKey": "<your-developer-api-key>" }
Step 4: Check that everything works
ocp accounts whoami
This one command tells you three useful things:
- your vendor ID, which goes into your app’s
app.yml - the OCP accounts you can install apps into
- the CMS instances you can reach, with their IDs, which you’ll need later to install your app
Registering and Creating Your App
Register the app once, then let the CLI create the project for you.
Step 1: Register your app in the Developer Portal
Registering reserves your app’s ID with OCP. In the OCP Developer Portal, open Apps and click Register app:
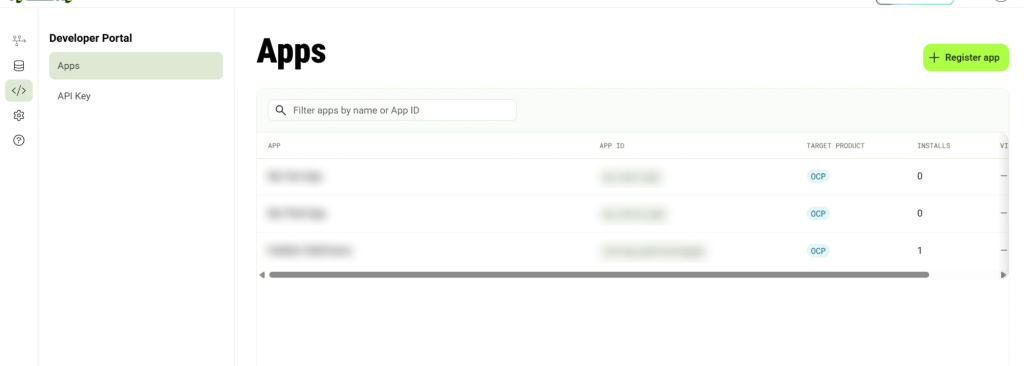
- App ID: a unique, lowercase ID with underscores, such as
publish_child_items. Choose carefully: it can’t be changed later. - Display name: the name people see, such as Publish Child Items.
- Target product: OCP.
Step 2: Create the project
One command creates the project from Optimizely’s CMS UI Extensions Sample template, a ready-to-run sidebar extension with a backend function already connected to it:
ocp app init --app-id <app_id> --display-name "<Display Name>" --summary "<what your app does>" --support-url <https://your-support-url> --contact-email <you@example.com> --category Productivity --template "CMS UI Extensions Sample" --package-manager npm --directory <project-folder> --no-prompt
Replace the <placeholders> with your own values. --app-id must match the ID you registered.
Prefer to be guided? Run ocp app init on its own and answer the prompts instead.
Step 3: Initialise Git
OCP expects your app to live in a Git repository, so do this straight away:
cd <project-folder>
git init
Step 4: Two small touch-ups
The template gives you a great head start. We made two small adjustments to suit our setup:
- Add a version to
app.yml, underdisplay_name. We use versioned releases in this guide, and the CLI reads the version from here:
version: 1.0.0-dev.1
2. Using npm? The template’s scripts in package.json call yarn. Change them to npm, for example yarn build → npm run build.
That’s it: you now have a real CMS UI extension app. Next, let’s look at what’s inside.
What’s Inside Your App
The template is small, and most of it you’ll never touch. These are the parts that matter:
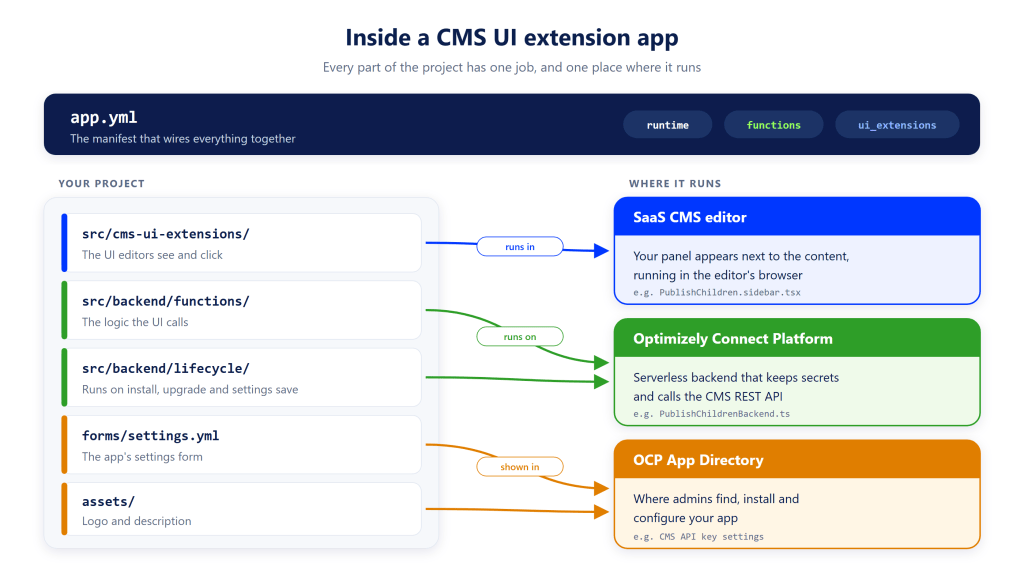
app.yml ties it together
The manifest declares the two halves of the app. Here’s ours, trimmed to the important lines:
runtime: node22-cms-ext          # marks this as a CMS UI extension app

functions:
  cms_extension:                 # the name the UI uses to call the backend
    entry_point: PublishChildrenBackend
    accepts: cms_ui_extension    # only our UI can call it, with no public URL

ui_extensions:
  sidebar:
    - name: publish-children
      entry_point: PublishChildren    # → PublishChildren.sidebar.tsx
      display_name: Publish Child Items
Each entry_point points to a file: PublishChildren is the sidebar file PublishChildren.sidebar.tsx, and PublishChildrenBackend is the backend class of the same name.
💡 Tip: the file name tells OCP where the UI appears.
MyPanel.sidebar.tsxbecomes a sidebar, andMyPage.view.tsxbecomes a full page.
So we have a sidebar and a backend function. Next: how do they talk to each other?
How the Sidebar Talks to the Backend
This is the heart of every CMS UI extension app. The sidebar and the backend never call each other directly. The CMS carries the message between them.
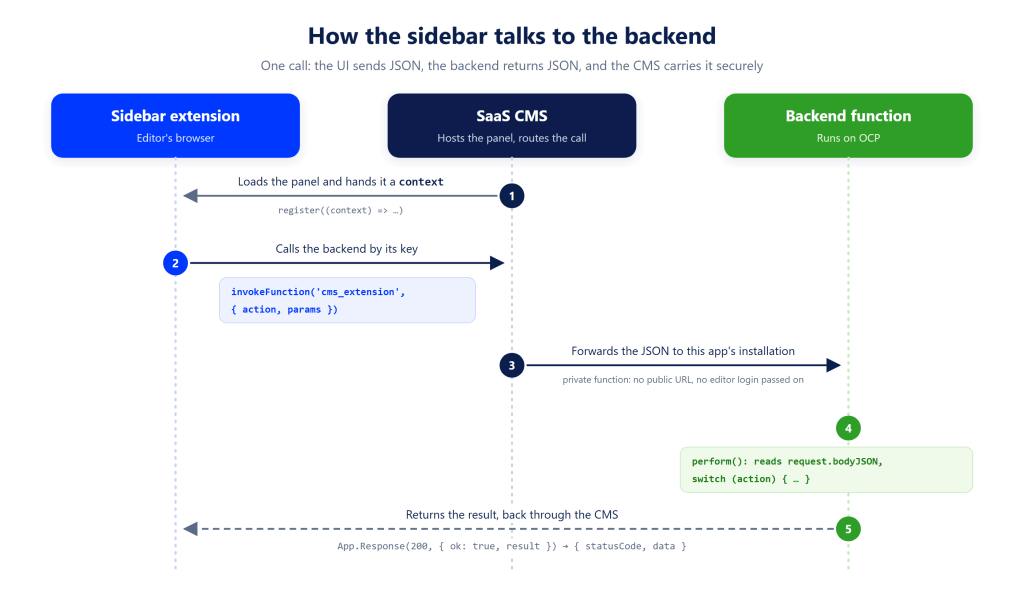
The sidebar sends a request
When the CMS loads your panel, register() gives you a context. Its invokeFunction() calls the backend using the function’s key from app.yml:
register((context) => <PublishChildren context={context} />);

// inside the panel
const response = await context.extension.invokeFunction('cms_extension', {
  action: 'listChildren',
  params: { key: contentKey }
});
The backend answers it.
On OCP, your function class receives exactly that JSON in this.request.bodyJSON:
export class PublishChildrenBackend extends App.Function {
  public async perform(): Promise<App.Response> {
    const { action, params } = this.request.bodyJSON;

    switch (action) {
      case 'listChildren': return new App.Response(200, { ok: true, result: /* children */ });
      case 'publish':      return new App.Response(200, { ok: true, result: /* results */ });
    }
    return new App.Response(400, { ok: false, error: 'unknown_action' });
  }
}
Whatever the backend returns arrives in the sidebar as response.data.
Two patterns that made life easy
- One function, many actions. Rather than one backend function per feature, we send an
actionname andswitchon it. Adding a feature means adding acase. - Always return the same shape. Every reply is
{ ok: true, result }or{ ok: false, error }. The sidebar checksokonce and never has to guess.
💡 Tip: only the JSON you send reaches the backend. The editor’s login doesn’t, so if your backend calls the CMS, give it its own API key through the app’s settings form.
Deploy and Try It in Your CMS
Time to see it inside the editor. Four steps take you from code to a working panel.
💻 The complete source code for Publish Child Items is on GitHub: chiragkhanna28/OptimizelyPublishingApp
Step 1: Validate: Lints, builds, tests and runs OCP’s checks. Look for “Looks good to me”.
npm run validate
Step 2: Publish a dev version: OCP builds it in the cloud. Dev versions need no review, which makes them perfect for testing.
ocp app prepare --bump-dev-version --publish
Step 3: Install it on your CMS. Use the CMS instance ID from ocp accounts whoami. --scope is what installs it on that CMS.
ocp directory install <app_id>@<version> --scope <cms-instance-id>
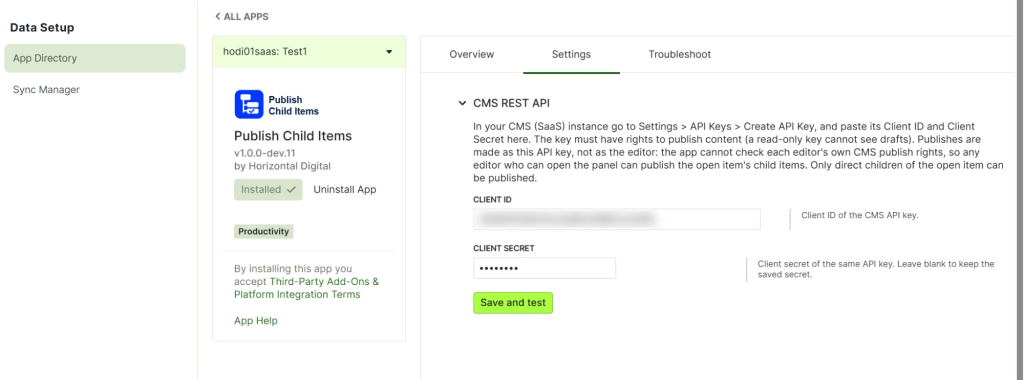
Step 4: Configure and open. Add your settings in the OCP App Directory, enable the extension in the CMS, and open a page.
App Settings:
App Preview:
💡 Tip: to ship a change, run steps 1 and 2 again and reload the CMS. To watch the backend while you test, use ocp app logs --appId=<app_id> --scope=<cms-instance-id> --tail.
Final Thoughts
It began with one editor’s question and ended with a small panel that saves real time every day. Along the way, it showed us how approachable extending Optimizely SaaS CMS has become: a familiar stack, a clear structure, and a platform that takes care of hosting for you.
A few things we’d gently pass on to anyone starting their first app:
- Begin with the template. It gives you a working sidebar and backend from the very first run.
- Let each half do its job. The sidebar talks to editors, and the backend takes care of everything secure.
- Think like an editor. Multiple languages, larger sections and the occasional slow first call are all part of real content work, and planning for them early makes the experience feel effortless.
- Test in a real CMS, often. Dev versions make every change quick to try.
Publish Child Items is now with the Optimizely team for review. Once approved, it will be available in the App Directory for everyone to install. The review and release journey deserves its own story, and we look forward to sharing it in a follow-up post.
Thank you for reading. If this inspires an idea for your own SaaS CMS app, we’d be glad to hear about it, and happy building!
Happy Optimizing!!!

